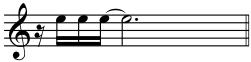
Learning Tremolo Tremolo is relatively rare in the guitar repertoire. But it’s the foundation of one of the most popular works for guitar: Recuerdos de l’Alhambra. Since most of us who play guitar eventually want to learn this piece, tremolo becomes a “must have” technique. I intend this article for those who’ve tried and failed to develop a good right hand tremolo. If you’re an intermediate to advanced player who doesn’t yet have a good tremolo, you might find this to be an effective alternative to what you’ve tried in the past. Before beginning, you should recognize that no amount of practice can fully overcome bad technique. If your right hand position or movement are basically flawed, then you’ll have to work harder to achieve less. Good basic right hand positioning and movement are beyond the scope of this article, but remember they’re the foundation of everything that follows. Another caveat: You should be cautious about any intensive work on your right hand technique, particularly if you’re an adult over forty. A sudden increase in the kind of practice outlined below can lead to soreness in your right shoulder. A reasonable amount of time to put into this procedure is fifteen to twenty minutes a day, and certainly no more than a half hour. Pay attention to your body, and pace yourself. Remember, you’re trying to improve your playing, not put yourself in a hospital. More than most techniques, tremolo relies on speed to be effective. Without control, however, speed is useless. And here lies the basic problem with learning tremolo: speed and control don’t get along well with each other. Speed is easier when control is set aside, and vice-versa. Of course, no one denies that either can be ignored in a good tremolo. And in the vast majority of technical study, guitarists begin with control and then gradually add speed. Indeed, most of the time this is the only sensible way to go. But in learning tremolo, it’s time to turn this process on its head—you’ll now begin with speed and gradually add control. To begin, you must first get an idea of how a finished tremolo should feel. So start by lightly drumming a, m, i on a table top. Do this (and all the following exercises) no slower than a quarter note at 138. Drum all three fingers in one quick and smooth movement, pause, then repeat: a, m, i—pause—a, m, i—pause—a, m, i—etc. As you do this, emphasize a light and easy feel in your fingers. It should feel as though you’re barely doing anything at all. REMEMBER THIS FEELING! Ideally, your finished tremolo will feel just this easy. This feeling is what you’ll be trying to cultivate in the exercises that follow. Now pick up your guitar and try this on the first string. For stability, lightly rest your thumb on the third string:
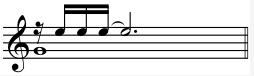
To hear this example, click here. At first, concentrate only on a feeling of physical ease. Each nail of each finger should glide easily over the string. (If your nails repeatedly catch on the string, they’re probably too long. File them down a bit and try again.) Try not to bounce your hand on each three note burst. Also, some people tend to roll their hand sideways, unconsciously compensating for the different length of each finger. Try to avoid this. Either bouncing or rolling your hand are defects to be avoided in tremolo, as they’ll inevitably hurt your accuracy. Don’t rigidy lock your hand in place—rather, think of it as floating in just the right place over the strings. If you find one or more fingers bumping into the second string, reposition your arm so that your fingers are a bit more curved toward the palm. Don’t overdo this, you need only enough curvature so that your fingers can easily clear the second string. Be sure that your a finger doesn’t slide along the string—rather, it should contact and depart the string at the same spot. Any sliding along the string is wasted motion. For now, don’t worry about loudness or the quality of your tone. These are control issues you’ll get to later. Also, don’t be concerned with how far your fingers follow through. This will take care of itself in due time. But it’s a good idea to let your fingers immediately release back to their ready position at the end of each cycle. Don’t rush this release—just let your fingers fall easily into their ready position. As you settle into an easy and smooth movement, now try to gradually control the rhythm, so that you produce three equally spaced notes. This will be challenging—your three note bursts will be raggedly timed at first. Stay with it, but don’t over-control it. Try to maintain an easy feel as you try to increase the accuracy of your timing. Monitor yourself as you do this. Does your right shoulder tense up as you try to control the rhythm? Then ease off the control, consciously relax your shoulder, and try again. Does your breathing become irregular? This is a sign of over-control—again, ease off, relax, and try again. Precisely what do I mean by over-control? Well. it’s easier to hear than to describe. But think of it this way. If I read aloud the following sentence: “What do you want to do?” it will sound something like this: “Whadaya wanna do?” This is perfectly idiomatic and understandable to anyone fluent in English. But if I over-control my recitation, it might sound like this: “WHAT...do...you...WANT...to...DO?” To any native speaker this sounds affected, as though I’m speaking a language I don’t quite understand. In effect, this explains what you’re going for in this tremolo exercise. You want the three note burst to roll trippingly off the tongue, so to speak. You don’t want it to sound as though you’re over-articulating each note. As you experiment with these bursts, you might encounter one of the following problems:
Be particularly alert to how both a and c (the little finger) feel. In any complex right hand movement they often tense up—ideally they should move together freely and easily, like a well-oiled hinge. The keys here are to listen, then remember the feel. When it sounds good, try to repeat the feel—when it sounds bad, try to change the feel. Don’t be surprised if this doesn’t yield immediate results. The challenge here is that when you do each burst, you won’t know if the feel is correct until after you’ve heard the resulting sound. In a sense, you’re like a man walking in the woods at night, trying to shine a light on the skittish critters around you whenever you hear a sound. By the time you swing the light in the direction of the sound, the critter has run off, leaving you to guess what it might have looked like. So be patient, and keep experimenting until your notes are evenly spaced, and you can do this as easily as when you were drumming your fingers on a table top. Always remember, your goals are physical ease and accuracy. Again, don’t worry about tone or volume. When you have this down, move on to the next exercise:
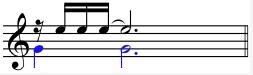
To hear this example, click here. Now you’re adding the thumb into the mix. Again, concentrate on physical ease and rhythmic accuracy. Don’t be concerned with tone or volume, and don’t over-control the movement. Use just barely enough control to accurately time the four note bursts. When this is going well, try this:
To hear this example, click here. Listen closely as you do this. Are you accenting the last thumb stroke of this five note burst? If so, you’re over-controlling the movement—the accented last note means you’re increasing physical tension through the burst. Try to keep all the notes as dynamically even as possible. Again, don’t worry about tone, and don’t worry about playing loud. Your goals are physical ease, rhythmic accuracy, and dynamic evenness. When this is going well, try this:
To hear this example, click here. Again, focus on physical ease, rhythmic accuracy, and dynamic evenness. Remember the feeling of ease you had when merely drumming your fingers on a table top? That’s the feeling you’re going for here. Continue to monitor your right shoulder and your breathing. When this is going well, try this:
To hear this example, click here. Again, don’t crescendo through this burst—keep all the notes as dynamically even as possible. Your mantra is still physical ease and rhythmic accuracy. When the last exercise is going well, try looping it two or three times without pause. You’re now starting to do a continuous tremolo. Remember your goals: physical ease, dynamic evenness, and rhythmic accuracy. Again, you want this to feel as easy as drumming your fingers on a table top. At this point, you can begin to add more control to the mix. Notice all the above exercises are on the first string—this is the easiest string on which to do tremolo. Now you should move on to the other strings, where the room for error is smaller. Again, try to maintain the physical ease you’ve cultivated throughout this process. As your tremolo becomes more fluent and reliable, gradually increase the volume, and pay more and more attention to your tone quality. In time, you should be able to do tremolo at any volume, on any string, with a full palette of color—all the while maintaining the physical ease you felt when you began this process by lightly drumming your fingers on a table top. ________________________________________________________________ Now to answer some questions that might have come up. Should I use planting during these exercises? If you wish, you can very lightly prepare a on the string at the beginning of each burst. But you may want to delay planting until the late stages of your development of tremolo. In these exercises, remember that you’re beginning with speed, then gradually adding control. Since planting is a control technique, it can interfere with your feeling of physical ease. Bear in mind also that, with the fingers, planting is of limited use in tremolo. Should I emphasize movement at any particular finger joint? No. In this process, you should focus on how it feels, not how it looks. If you cultivate the greatest possible feeling of ease, then the finger movements will take care of themselves. What should c (the little finger) be doing? It should move easily with a. During this process, should I vary the strings played by the thumb? Not at first, but it’s a good idea as you become more fluent. The farther the thumb moves away from the fingers, the more it can interfere with their easy movement. So it’s a good idea to work with this until you can easily play the sixth string with the thumb while doing tremolo on the first string. |
|


 |
||
____________________________________________________________________________________________________________________ |
|
|
||||||
 |
 |
|||||